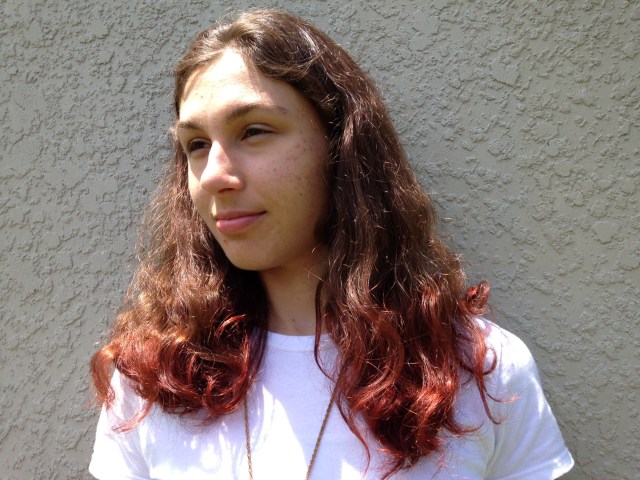
How to Get Dip-Dyed Red Hair
I wanted dip-dyed hair for a long time. Here’s how I did it at home.
Disclosure: This post may contain affiliate links to products that I recommend. When you click on an affiliate link to a product on an external website, I will receive compensation if you buy something. Thank you for your support.
For a long time, I was super-inspired by photos & people I saw throughout the day who had ombre hair. I absolutely loved the way it looked & knew that I wanted my hair to look that way.
A few months ago, I tried doing this look with a light reddish brown color, but as the dye I used wasn’t a high-lift variety & the color was somewhat similar to my natural color, the color didn’t show up very well unless I was in bright sunlight. I was disappointed by the results, but decided to give my hair a break for about six weeks before dying it again so I didn’t dry it out too much. I decided to learn more about the process of dying hair ombre & which dyes would give me the results I wanted. Additionally, I couldn’t decide whether I wanted to have the ombre effect done with red or blonde dye.
I eventually settled on red, & I’m so glad I did! After selecting a high-lift dye that I ended up being pretty satisfied with (Garnier Ultra-Color Nourishing Color Creme, Ultra Color R3 – Light Intense Auburn
), I followed the directions on the box & let the dye sit in my hair for about 30 minutes or so, if I’m remembering correctly. I applied the dye using the applicator in the box. I tried to concentrate most of the dye on the very tips of my hair, then blended it upwards both by using my fingers, & twisting the strands of hair to force the dye upwards in a blended manner so there wasn’t a harsh line between where I dyed it & my normal hair color. If you want to learn more about how I did it, read this article that I found incredibly helpful.

At first, when I was rinsing my hair afterwards, I didn’t see that much of a difference, as my hair looked darker when it was wet & the contrast wasn’t so great. When my hair dried, I was very impressed by the boldness of the color. It actually was a lot more red than it is in these pictures, which I took probably four or five days after I colored my hair.
Unfortunately, the color started fading pretty much immediately after I dyed it. Every time I washed my hair, despite rinsing it thoroughly after I washed it, dye still rinsed out, & when my hair was wet, it actually made light orange stains on my bedding & several shirts of mine (thankfully all the stains washed out after I treated them with stain remover). The color also faded quite fast, which was kind of a bummer.

After having this happen, I read online about dyed red hair & learned that it is notoriously challenging to maintain, & that it is completely normal for it to fade quickly, even if you get it professionally done at a salon. I read that this is because the molecules of red pigment in the dye are larger than other colors of dye & therefore, the pigments can’t penetrate the center of the hair, so it kind of just clings to the outside. Learning this made me feel better about what my hair was doing because I knew the fading had nothing to do with the dye I used, the method I used to dye it, or my hair being abnormally resistant to dye. Now I know this isn’t the case. I also found some really great products that preserve red hair color. I’ve started using the John Frieda Radiant Red Color Protecting Shampoo (& I’m going to buy the matching conditioner soon; the store I went to unfortunately was out so I have to go back & buy some next time I have a chance) & it seems to be bringing out the red highlights in my natural hair color already!

My hair dye has since faded away almost completely, & I really, really miss it, because I loved how it looked SO MUCH & I realized that red hair looks good on me. So, I decided that I want to dye it again. I want to try using red Manic Panic dye, because it’s vegetable based, contains no harmful chemicals, & because of this, I’ll be able to use it much more often than regular dye without damaging my hair. I prefer natural products when a natural, cost-effective alternative which works well is available, so Manic Panic being vegan, not tested on animals, & relatively natural is a big plus for me. Another big plus for me is the fact that as opposed to regular hair dye, which has one application which you mix in a bottle & then apply, Manic Panic comes in a tub & therefore it can be used for more than one application, or can even be diluted by conditioner for touch-ups or to adjust how bold the color is. I’ll post photos on here once I use it & explain my methods!


You must be logged in to post a comment.